Unwrapping the Magic: Homemade Peppermint Chocolate Cookie Sandwiches
As the air turns crisp and festive lights begin to twinkle, there's a particular craving that emerges – one for comforting, yet exhilarating, holiday flavors. Few treats capture this spirit quite like the peppermint cream chocolate cookie sandwiches. Imagine sinking your teeth into a delightful creation where two rich, chewy chocolate cookies embrace a cool, velvety peppermint cream filling, all kissed with a sparkly crunch of crushed candy canes. It's a symphony of textures and tastes that evokes instant joy, making it a quintessential winter indulgence or a fantastic year-round pick-me-up.
Whether you're hosting a festive gathering, looking for a unique homemade gift, or simply want to treat yourself to something truly special, mastering the art of the peppermint cream chocolate cookie sandwiches recipe is a skill worth acquiring. This comprehensive guide will walk you through crafting these irresistible desserts, offering both time-saving shortcuts and the rewarding path of baking from scratch, ensuring your creations are nothing short of spectacular.
Why Homemade Peppermint Chocolate Cookie Sandwiches are a Must-Try
There's an undeniable charm to homemade treats, and these cookie sandwiches are no exception. Beyond the sheer deliciousness, making them yourself offers several compelling advantages:
- Unmatched Freshness and Flavor: Store-bought cookies simply can't compare to the warmth and aroma of freshly baked chocolate cookies, paired with a vibrant, homemade peppermint cream. You control the quality of ingredients, from the rich cocoa to the intensity of the peppermint.
- Customization at Your Fingertips: Want darker chocolate cookies? A bolder peppermint kick? A vegan filling? When you make them yourself, you have the power to tailor every element to your preferences or dietary needs.
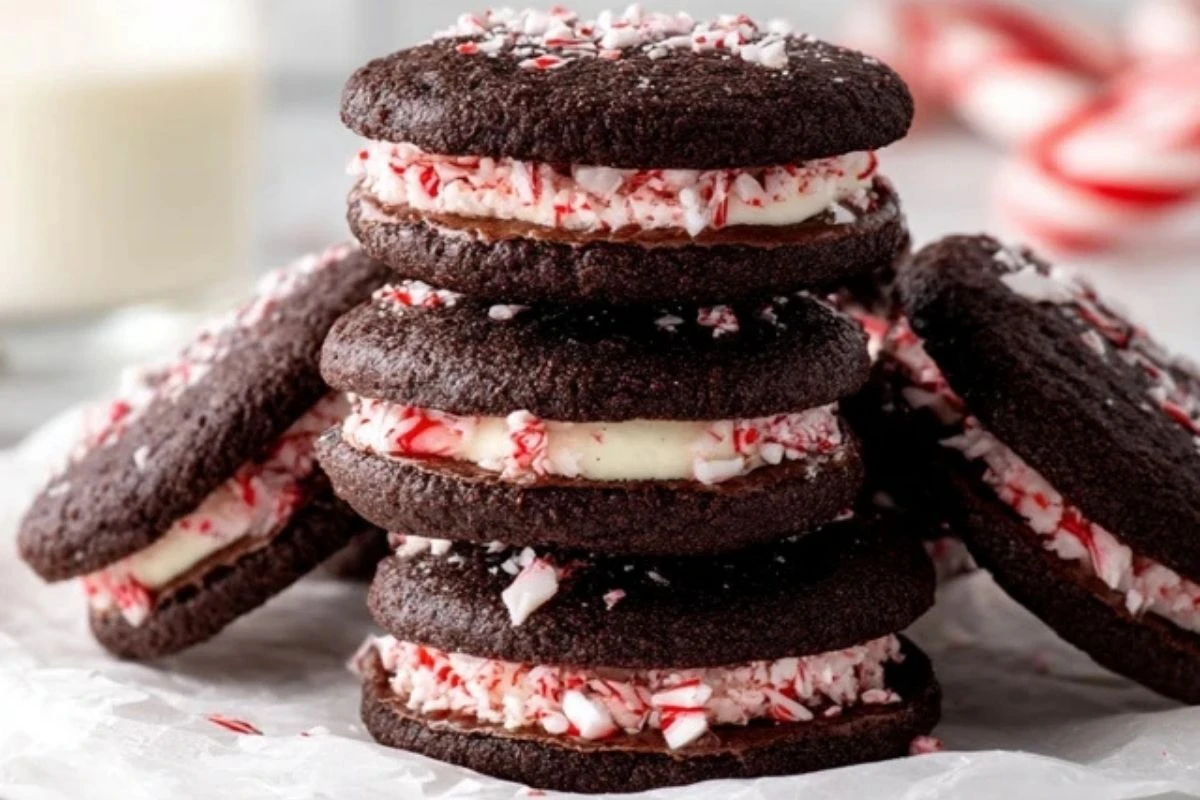
- Impressive Presentation: These sandwiches are visually stunning, especially when adorned with crushed candy canes. They make a fantastic centerpiece for a dessert table or a thoughtful, beautifully packaged gift.
- The Joy of Baking: For many, the process of baking is therapeutic and deeply satisfying. From measuring and mixing to assembling and decorating, each step contributes to a sense of accomplishment and culinary creativity.
- Versatility for Any Occasion: While they shine brightest during the holidays, these cookies are perfect for birthdays, potlucks, or simply an elevated everyday snack.
Crafting Your Decadent Peppermint Cream Chocolate Cookie Sandwiches: Two Approaches
You can achieve these blissful cookie sandwiches with varying degrees of homemade effort. We'll explore two popular methods: the quick-and-easy assembly for when time is of the essence, and the fully homemade artisan approach for the dedicated baker.
The "Quick Delight" Method: Speedy Satisfaction
Inspired by ingenious shortcuts, this method is perfect for those moments when you crave the decadent taste but have limited time for baking. It leverages quality store-bought ingredients to bring you delicious results with minimal fuss.
What You'll Need:
- 12-24 high-quality chocolate chunk cookies (e.g., your favorite bakery brand, or even premade dough baked off. For a truly unique twist, consider ordering a Chick-fil-A Peppermint Cookie Sandwiches: Easy Holiday Treat inspired approach by getting their cookies!).
- 1-2 pints of premium vanilla or peppermint ice cream (slightly softened).
- 1/2 - 1 cup peppermint candies or candy canes.
- A plastic bag and a mallet or rolling pin.
Simple Steps:
- Crush the Peppermint: Place your peppermint candies or candy canes in a sturdy plastic bag. Using a mallet, rolling pin, or even the bottom of a heavy pan, crush them into varying sizes, from fine dust to small, glittering gems.
- Scoop and Sandwich: Take one chocolate cookie, flat side up. Scoop a generous portion of slightly softened ice cream onto its center. Place another chocolate cookie on top, gently pressing down to create an even sandwich. Be careful not to press too hard, or the ice cream will squish out excessively.
- Roll in Radiance: Hold your assembled cookie sandwich by its sides and gently roll the exposed ice cream edge in the crushed peppermint pieces. The soft ice cream will act as a natural adhesive, picking up the festive sparkle.
- Chill and Enjoy: For best results and firmer sandwiches, place them on a parchment-lined baking sheet and freeze for at least 20-30 minutes before serving. Enjoy immediately with a glass of cold milk!
Pro Tip: Work quickly with the ice cream to prevent it from melting too much. If making a larger batch, assemble a few at a time and pop them back into the freezer as you go.
The "Artisan Bake" Method: From Scratch Perfection
For the ultimate homemade experience, baking your chocolate cookies from scratch and crafting a luscious peppermint cream filling is incredibly rewarding. This method allows for complete control over texture and flavor, yielding a truly gourmet dessert. This approach is the heart of any truly special peppermint cream chocolate cookie sandwiches recipe.
Part 1: The Soft, Chewy Chocolate Cookies
We're aiming for a cookie that's rich in chocolate flavor, slightly chewy, and sturdy enough to hold its filling but soft enough to bite through easily. Here's a general guide for a batch of 24-30 cookies (12-15 sandwiches):
Ingredients:
- 1 cup (2 sticks) unsalted butter, softened
- 1 ½ cups granulated sugar
- 2 large eggs
- 1 teaspoon vanilla extract
- 1 ¾ cups all-purpose flour
- ¾ cup unsweetened cocoa powder (Dutch-processed for a darker color)
- 1 teaspoon baking soda
- ½ teaspoon salt
- 1 cup chocolate chips or chunks (optional, but highly recommended!)
Instructions:
- Preheat & Prepare: Preheat your oven to 350°F (175°C). Line two baking sheets with parchment paper.
- Cream Butter & Sugar: In a large bowl, cream together the softened butter and granulated sugar until light and fluffy (2-3 minutes with an electric mixer).
- Add Wet Ingredients: Beat in the eggs one at a time, mixing well after each addition. Stir in the vanilla extract.
- Combine Dry Ingredients: In a separate bowl, whisk together the flour, cocoa powder, baking soda, and salt.
- Mix Wet & Dry: Gradually add the dry ingredients to the wet ingredients, mixing on low speed until just combined. Be careful not to overmix. Stir in the chocolate chips/chunks if using.
- Scoop & Bake: Drop rounded tablespoons of dough onto the prepared baking sheets, leaving about 2 inches between cookies. Bake for 9-11 minutes, or until the edges are set but the centers still look slightly soft.
- Cool: Let the cookies cool on the baking sheets for 5 minutes before transferring them to a wire rack to cool completely. This is crucial before adding the filling.
Part 2: The Velvety Peppermint Cream Filling
This light, refreshing cream provides the perfect counterpoint to the rich chocolate cookies. Unlike ice cream, it's stable at room temperature for a short while, making it excellent for gatherings.
Ingredients:
- ½ cup (1 stick) unsalted butter, softened
- 2 cups powdered sugar, sifted
- 1-2 tablespoons milk or heavy cream
- 1 teaspoon peppermint extract (or to taste)
- Optional: 1-2 drops green food coloring (for festive color)
Instructions:
- Cream Butter: In a medium bowl, beat the softened butter with an electric mixer until light and fluffy, about 2 minutes.
- Add Sugar & Liquid: Gradually add the sifted powdered sugar, alternating with the milk/cream, beating until smooth and creamy.
- Flavor & Color: Beat in the peppermint extract and, if desired, 1-2 drops of green food coloring until fully incorporated and the desired color is reached.
- Chill (Optional): For a firmer filling, especially if piping, refrigerate the peppermint cream for 15-30 minutes.
Part 3: Assembly & Finishing Touches
Now comes the fun part – putting it all together!
Ingredients:
- Crushed peppermint candies or candy canes (as prepared in the "Quick Delight" method)
- Optional Chocolate Glaze: ½ cup semi-sweet chocolate chips, 1 tablespoon vegetable or coconut oil
Instructions:
- Fill the Cookies: Take one cooled chocolate cookie, flat side up. Spoon or pipe about 1-2 tablespoons of peppermint cream onto the center. Top with another cookie, gently pressing to spread the filling to the edges. Repeat with remaining cookies.
- Optional Chocolate Glaze & Peppermint Sprinkle:
- Melt the chocolate chips and oil together in a small bowl over a pot of simmering water (double boiler method) or in the microwave in 30-second intervals, stirring until smooth.
- Dip the top of each cookie sandwich into the melted chocolate glaze, allowing excess to drip off.
- Immediately sprinkle the tops with crushed peppermint candies before the chocolate sets.
- Chill to Set: Place the assembled cookie sandwiches on a parchment-lined baking sheet. Freeze for about 20-30 minutes (if using ice cream filling or for firmer cream) or refrigerate for at least 1 hour (for cream filling and chocolate glaze) until the filling and glaze are firm.
This full process allows for truly distinctive Peppermint Chocolate Cookie Sandwiches: Quick vs. Homemade creations that taste as good as they look!
Essential Tips for Perfect Peppermint Chocolate Cookie Sandwiches
- Cool Completely: Ensure your cookies are entirely cool before adding any filling, especially if it's cream-based. Warm cookies will cause the filling to melt or become messy.
- Consistency is Key: For the cream filling, adjust the milk/cream until you reach a spreadable, yet firm, consistency. It should hold its shape.
- Don't Overbake Cookies: Slightly underbaked cookies will be chewier and softer, making them ideal for sandwiches. Overbaked cookies can be dry and crumbly.
- Peppermint Power: Peppermint extract is potent! Start with 1/2 teaspoon and add more gradually to the cream filling until you reach your desired intensity.
- Crushing Candies: For a varied texture, crush some peppermints finely and leave some in small chunks. This adds both visual appeal and a satisfying crunch.
- Storage Savvy: Store your finished cookie sandwiches in an airtight container. If using ice cream, keep them in the freezer. If using cream filling, they can be stored in the refrigerator for up to 3-4 days, or frozen for longer storage (up to 2-3 weeks).
Elevate Your Dessert Game: Serving and Gifting
These homemade peppermint chocolate cookie sandwiches are more than just a dessert; they're an experience. Serve them with a tall glass of cold milk, a steaming mug of hot cocoa, or a festive coffee for a truly indulgent treat.
For gifting, arrange a few sandwiches in a decorative box lined with parchment paper. Tie it with a festive ribbon, and you have a thoughtful, delicious present that will be adored by friends, family, and neighbors alike during the holidays or any special occasion. They're sure to be a showstopper at any cookie swap or church social!
Conclusion
Whether you choose the speedy route or embark on a full baking adventure, creating your own homemade peppermint cream chocolate cookie sandwiches is an incredibly satisfying endeavor. The irresistible combination of rich chocolate, refreshing peppermint, and creamy texture makes these treats truly unforgettable. So, gather your ingredients, put on your apron, and get ready to fill your home with the delightful aroma of baking and your palate with pure, minty chocolate bliss. Enjoy the process, and savor every exquisite bite of these holiday-favorite cookie sandwiches!
